Recycling bins, Save the Bay
signs, and that all-too-familiar green circle of arrows—all a part of our daily
lives. Children raised in this era of environmental responsibility have an
advantage over past generations. Most children know the routine—remove the
caps, rinse the bottle, and place it into the blue tub. Toy swap parties
provide not only an afternoon of play with neighborhood friends, but they are
also a way to share and replace toys that children have outgrown.
With this positive trend in mind, I present today’s year-long
environmental impact project. For several years this project was part of my routine in both elementary and middle school classroom levels. The complexity of the project can be easily modified to suit the educational needs
of your students.
WHERE WILL WE PUT ALL THIS STUFF?
Phase 1

Objectives:
Students will make predictions
based on their prior knowledge about which items placed in a plastic tub will
decompose.
Students will list and describe
the conditions necessary for an object to decompose.Students will gather and interpret data related to weather.
Students will read a grid map to locate and identify objects.
Students will identify and describe various types of soil based on appearance and physical properties.
This activity is designed as a cross-curriculum activity to address the
environmental impact caused by the things we use for normal daily living.
Students will conduct a year-long decomposition project, culminating with an
excavation activity and seasonal planting, just in time for Earth Day in April.
Additional, but optional, areas of study include weather patterns, regional
climates, sorting materials, daily record keeping, identifying various forms of
precipitation, grid and map reading skills, and implementing the scientific
process.
MATERIALS:
Plastic tub with lid
Wire snips
Ruler
Awl
String or thin ribbon
Dry soil from the area
Enough gallon size zipper bags
to allow one for each student
Various items to place into the
tub of dirt of different materials (paper, cardboard, metal, plastic, cloth,
glass, etc.)
Rain gauge or plastic container
(if project is conducted inside)
Plastic drop cloth for
classroom (if project is conducted inside)
Camera
**Additional material requirements will be added as the project
phases are added to this blog. Please check back for updates.
INSTRUCTIONS:
For demonstration purposes, the items placed in the decomp tub are
geared towards a target audience of first to third grade students.
Preparation:
1. Prior to the activity, prepare the tub by cutting slots at regular
intervals across the edges of the tub. These slots will be used to add the rope
grid.
2. Using an awl or drill, add several small drain holes at the bottom
of the tub. These will simulate natural drainage of many types of soil.
3. Involve the students in the preparation process:
a. Conduct a guided classroom discussion and collection of objects in
your school that are made of various materials. Assign a homework project to
bring in 2 small objects—one they predict will decompose and one object they
predict will not.b. Have each student bring in 2 cups of soil from their yard in a sealed plastic bag to place into the decomposition tub. Depending upon the size of tub used, you may need to supplement with soil from your yard. A follow-up activity based on this task will be added later in the year.
ACTIVITY:
1. If the project is conducted inside, place the plastic drop cloth on
the floor.
2. Sort the items that were brought in by the students by material. If
an object is composed of more than one type of material, choose the prominent
material for the category.
3. Select the items to be placed into the tub. This step is a great
springboard for a discussion on size as not all of the objects will fit into
the tub. The goal is to select a sampling of material types. (Plastic, paper,
cardboard, metal, glass, Styrofoam, coated paper, etc.) Set the selected items
to the side while step 4 is completed.

*It helps to cut some of the larger items to a smaller size to allow
room for more objects.

4. Fill the tub half way with the soil that was collected by the students.
Mix the soil well with hands or a small shovel.


6. Add the string or ribbon grid to the tub. This will be used to help
locate the items near the end of the project in the spring. Take a photo of the
tub with the objects. This photo will also be used for a follow-up activity
later next month.
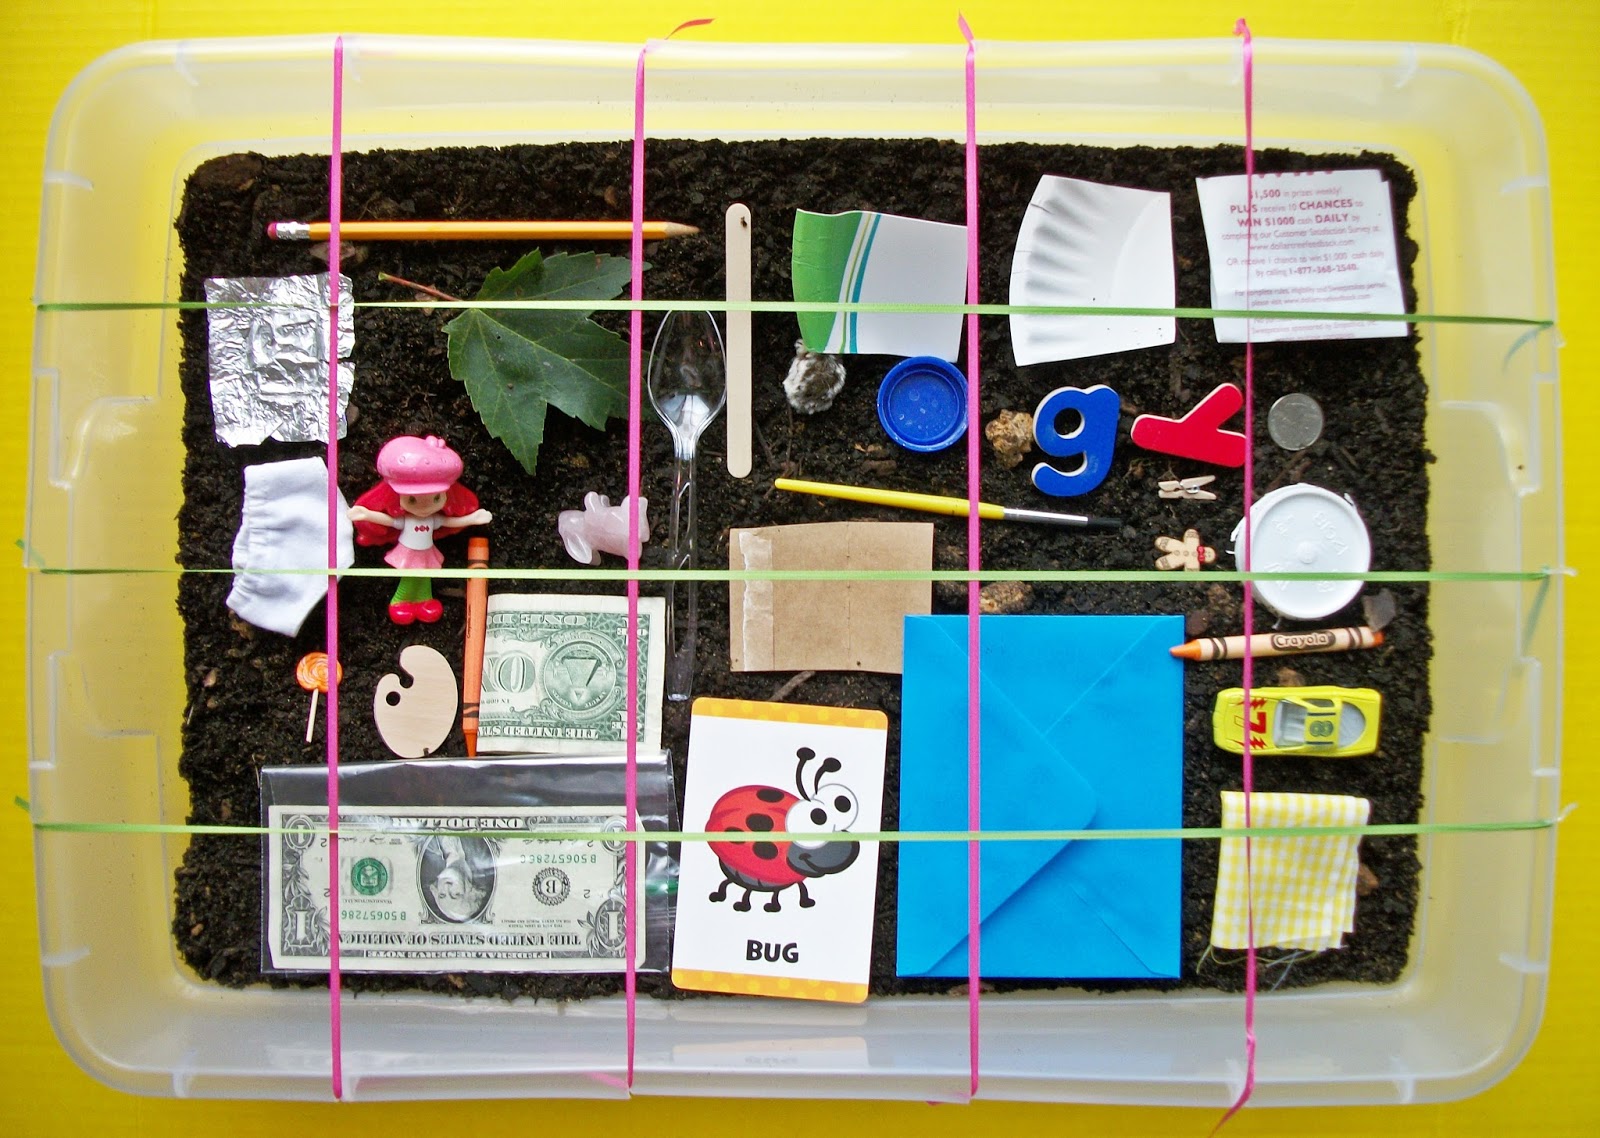
7. Carefully add the remaining soil to cover the objects. There should
be at least 2 to 3 inches of soil over the objects. If desired, add compass directions to the tub.


8. Place the rain gauge or plastic container outside and wait for the
next rainfall. If your summer weather has been anything like ours, you won’t
have to wait too long. J
9. Check this blog for the next segment of this year-long project.
Phase 2, AFTER THE RAIN FALLS, will be added in early
September.
In the meantime, enjoy your end-of-summer holiday
weekend.
No comments:
Post a Comment